


Links add flexibility to Linux filesystems because, as anyone who has ever written a word about Linux tells you, everything is a file. There are two types of links in a Linux filesystem links: hard and soft. While used to solve similar issues, the difference between the types of links is large, but both provide multiple directory entries/references to a single file.
Most applications link to libraries using a generic names and only a major version number in the link name, while the link pointing to the actual library file also has a minor version number. In other situations, required files get moved from one directory to another due to the specifications of the Linux file filesystem, and the links in the old directories required for backwards compatibility with those programs that have not updated to the new locations. If you do a long listing of the /lib64 directory, you can find examples of linking.

The long listing of the /lib64 directory above shows that the first character in the filemode is the letter “l,” which means that each is a soft or symbolic link.
Hard links
Now you will finally understand the significance of the often repeated mantra that “Linux and other Unix-like Operating systems maintain consistency by treating everything, including hardware, as a file. These file contain data and metadata such as their size, ownership, permissions, timestamp etc. This metadata is managed with a data structure known as an inode (index node). Each Linux file has one inode containing metadata information about that file, including the location of the data belonging to that file. Every file must have at least one directory entry that points to the inode describing the file. The directory entry is a hard link, thus every file has at least one hard link.

As inode numbers are unique within individual filesystem, hard links are limited to files contained within that filesystem (by definition, a partition or logical volume (LV) that is mounted on a specified mount point). So a computer with different filesystem, mounted at /home, /var and /opt duplicates its inodes numbers
As all the hard links point to a single inode containing the file’s metadata as these attributes are part of the file (and cannot be different for each hard link), such as :
- File type: regular file, directory, pipe etc.
- Permissions to that file: read, write, execute
- Link count: The number of hard link relative to an inode
- User ID: owner of file
- Group ID: group owner
- Size of file: or major/minor number in case of some special files
- Time stamp: access time, modification time and (inode) change time
- Attributes: immutable’ for example
- Access control list: permissions for special users/groups
- Link to location of file
- Other metadata about the file
The file name is the only attribute which can be different and is not contained in the inode. Since there can be no duplication of file names within a single directory, hard links to a single file/inode located in the same directory must have different names,
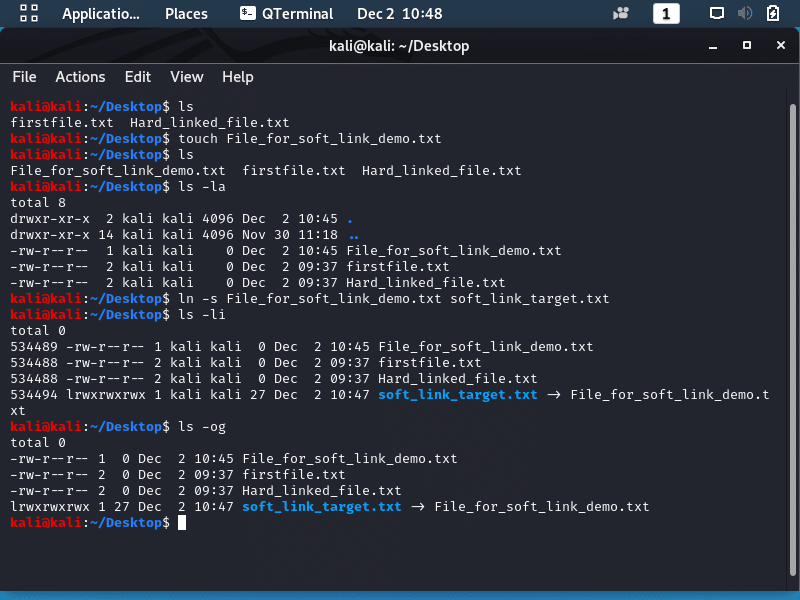
The number of hard links for a file is displayed with the ls -l command. If you want to display the actual inode numbers, the command ls -li does that.
Establishing a Hard Link
A hard link is a file or directory that has one index (inode) number but involves having least two different file names. Having a single inode number means that it is a single data file on the filesystem. Having two or more names means the file can be accessed in multiple ways. The diagram below shows that although physically one file, it has two names; a hard link has been created and has two file names and one inode number, meaning there is one filesystem location on the disk partition.

Hard linking allows for the creation of a pseudo-copy of a file without copying its data and is often used in file backups when there not enough filesystem space. If one of the file’s names gets deleted, you still have another file name that links to the same data.
To create a hard link, use the ln command. For hard links, the original file must exist prior to issuing the ln command. The linked file must not exist.

In the image above firstfile.txt, created prior to the hard linking, is linked to Hard_linked_file.txt by the “ln” command. The Hard_linked_file.txt is actually created by the linking process and when the inode numbers for these files are checked with the “ls -i” command, and you notice they are the identical for the hard linked files.
Another thing to check are link counts with the “ls -og” command, the file’s metadata is displayed, which includes file type, permissions, link counts, file size, creation dates, and file names.
Notice that both files have a link count of 2 as they each hard linked to one other file; a file with no hard links a link count of 1 because it is not hard linked to another file. You can remove a linked file by using the “unlink” command with the following syntax:
unlink
Symbolic (soft) links
Soft/symbolic links point to a directory entry (one of the hard links) and not the inode; they are not dependent upon the inode number and can work across filesystems, spanning partitions and logical volumes
The downside to this is: If the hard link to which the symlink points is deleted or renamed, the softlink no longer functions as it points to a non existent hard link. The “ls” command highlights broken links with flashing white text on a red background in a long listing.
Constructing a Soft Link
Typically, soft link files point to a file residing on another filesystem. When working with soft links, remember the following:
- The original file must exist before you issue the ln -s command.
- The second file name, the soft linked file, listed in the ln -s command must not exist prior to issuing the command. It is created when the command is issued
- An original file and its soft links do not share the same inode number because they do not point to the same data.
- An original file and its soft links do not share the same data.
- An original file and any of its soft links can exist in different directories.
- An original file and its softs links can exist in different filesystems.
- Stale links/dead links can be a serious security problem; Occurs when a soft link points to a file that was deleted or moved. If a new and possibly malicious file with the original file’s name and location is created, the soft link now points to that new file, which can compromise your system’s security.
To create a symbolic link, the ln command is used with the -s (or ––symbolic) option.
In the screenshot, you can see that when you execute the the “ls -li” command soft linked files have different inode numbers and do not experience a link count increase as a result of the linkage. In some situations, you have a soft linked file p to another soft linked file and in order to find the final file, use the “readlink -f” command with one of the soft linked file names as an argument to it; the utility displays the final file’s name and directory location.
Reading Files
Linux systems contain many text files and. They include configuration files, log files, data files, and so on. Understanding how to view these files is a basic but important skill. In the fol- lowing sections, we’ll explore several utilities you can use to read text files.
Reading Entire Text Files
Learning how to manage files, directories and text in Linux means reading a lot of files. Although primarily used to join and display text files, the basic file reading utility is the concatenate (“cat“) command. The syntax to view a small text file is:
cat [OPTION]
The -“n/–number” option for the “cat” command displays line numbers along with the file text.
The “pr” command, originally used to format text files for printing is useful to view entire text files, especially when you need some special formatting. To view a text file, use the following basic syntax:
pr [OPTION]…
The table below lists some commonly used options for the “pr” command.
| Short | Long | Description |
|---|---|---|
| -n | –columns=n | Display the file(s) in column format, using n columns. |
| -l n | –length=n | Change the default 66-line page length to n lines long. |
| -m | –merge | When displaying multiple files, display them in parallel, with one file in each column, and truncate the files’ lines. |
| -s c | –separator=c | Change the default column separator from tab to c. |
| -t | –omit-header | Do not display any file header or trailers. Only shows the text. |
| -w n | –width=n | Change the default 72-character page width to n characters wide. The -s option overrides this setting. |
Use the page length option, -l (or ––length), to shorten the file’s page length when viewing a short single file as if you don’t, the text scrolls off the screen. As seen in the image below, you can quickly view the files side by side. In this case, it is useful to employ the -m (or ––merge) option, as shown in Listing 3.24.
Listing 3.24: Using the pr command to display two files
If you want to display two files side by side and you do not care how sloppy the output is, you can use the paste command. Just like school paste, it will glue them together but not necessarily be pretty. When a text file is larger than your output screen, if you use commands such as the cat and pr commands, text may scroll off the screen. This can be annoying. Fortunately, there are several utilities that allow you to read portions of a text file, which are covered next.

Reading Text File Portions
Using the “cat” command to read a single file line or a small portion of a file, is quite akward and you are better off using the “grep” tool, which helps you find a file lines containing specific strings of text strings. The basic syntax for the grep command is:
grep [OPTIONS] PATTERN
Use the string for the PATTERN in the commands’ syntax when you search for a particular text string, and the file you are searching in as the FILE_NAME. When using the “grep” command to find a file line, be aware that is case sensitive, so if the string you enter does not match a string exactly, which includes case, within the target file, the command returns nothing. You can resolve this issue with the “-i/–ignore-case” switch, enabling grep to search for any instance of the string. The image below demonstrates this case sensitivity when looking for the term “File” in the fuse.conf file.

The “head” command is tool for displaying portions (by default, the command displays the first 10 lines) of a text file and its syntax is:
head [OPTION]… [FILE]…
The “-n/–lines=xx” option allows you to override the default behavior of only displaying a file’s first 10 lines.

In the image above, we used the -n 4 option with the head command display only the first 4 lines of the fuse.conf. We also eliminated the file’s bottom lines by using a negative number (-5) with the “-n/–lines=xx” option, so we displayed all the file’s lines except the last 5 lines.
Display the last lines of a file requires using the “tail” utility and it usage syntax is similar to the head command:
tail [OPTION]… [FILE]…
As you can see in the image below, similar to the head command, “tail” shows a file’s last 10 text lines, which can be modified with the “-n/–lines=xx” option, telling tail how many lines from the file’s bottom to display (3 in the image below). Adding a plus sign “+” in front of the argument instructs the tail utility to display the file’s text lines starting at the indicated line number to the end of the file’s end (started at line 10 in the image below).

The tail command with the “-f /–follow” allows you to watch log files in real time as new messages get appended to the file’s bottom. Watching new messages as they are added is handy. Upon entry of the command, you see a few recent log file entries immediately and additional messages as they are being added to the log file. End the log monitoring session using tail, you must use the Ctrl+C key combination.
Some Linux distributions have modified the location of log files now record messages are kept in a journal file managed by journald. In order to watch these journal file, use the “journalctl –follow” command.
Reading Text File Pages
There are a number of ways to read text files in Linux; one of the way is by using a pager utility which allows the viewing of one text page at a time as well as moving through the text. The “more” and “less” utilities.
Though simple, the “more” utility is quite useful (Although you cannot move backward through a file); You move forward through a text file by pressing the spacebar to move one page down or the Enter key to move one line down.

The “more” utility displays how far along you are on the screen’s bottom and any time you wish to exit from “more” pager, press the “q” key, even if you have reached the end of the file. Used as the default by the Linux man, the “less” utility is more functional than “more” (get it, “less is more”?) as it has the added functionality of allowing you to move backward through the file.
Since it does not read the entire file when it displays its first page , the less page utility allows faster file traversal. The up and down arrow keys can be used to traverse the file as well as the spacebar to move forward a page and the Esc+V key combination to move backward a page. Searching for a particular word within the file is accomplished by pressing the ? key, typing in the word you want to find, and pressing Enter to search backward. Replace the ? key with the / key and you can search forward.
Finding Information
There are various methods you can use to search for information on a Linux system.
Explore File Differences
The “diff” command allows for line by line comparisons of two files, line by line with the following syntax:
diff [OPTION]…
With the diff utility you can perform a variety of comparisons. In addition, you can format the output to make the results easier for viewing. The table below shows a few of the more commonly used options.
| Short | Long | Description |
|---|---|---|
| -e | -ed | Creates an ed script, used to make the first file compared the same as the second file compared. |
| -q | –brief | If files are different, issue a simple message highlighting this. |
| -r | –recursive | Compare any subdirectories within the original directory tree, and consecutively compare their contents and the subdirectories as well (recursive). |
| -s | –report-identical-files | If files are the same, issue a simple message notifying the user of this. |
| -W n | –width n | Display a width maximum of n characters for output. |
| -y | –side-by-side | Display output in two columns. |
In the image below, you can view files side by side to see difference quickly, modify the diff command’s output to display the files in a column format with he -y (or –side-by-side) option a. The pipe symbol (|) divides the second file’s lines from those in the first file when there is a difference between the contents of the line.
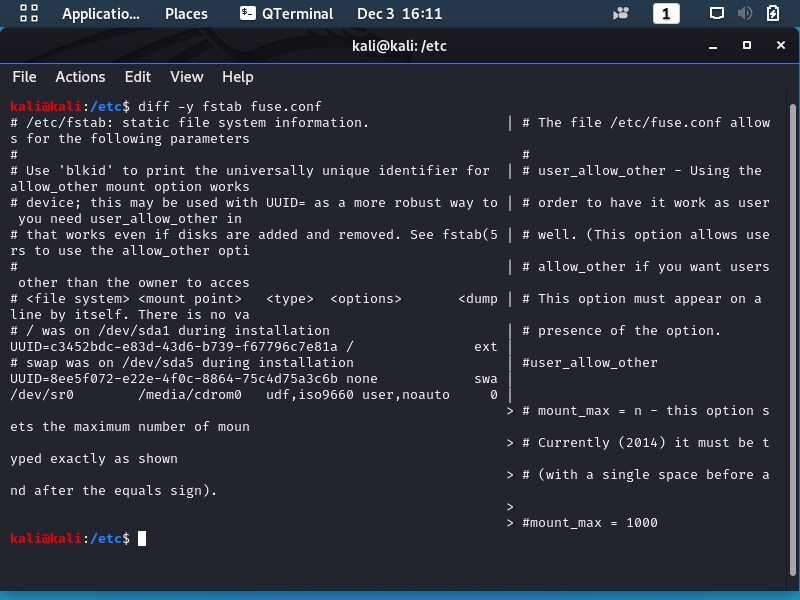
The diff utility provides more than just differences. It also denotes what needs to be appended, changed, or deleted to make the first file identical to the second file. To see the exact differences between the files and any needed modifications, remove the -q switch.

Pinpoint Commands
Commands that quickly locate (pinpoint) files allow you to:
- Determine if a specific utility is installed on your system
- Locate a configuration file
- Find documentation,

The image above shows the use of both the “which” and “whereis” commands
- The “ls” command shows the full path name of a shell command passed as an argument. In this case, the “which” command is used to find the “ls” command’s program location and displays the full path name of /usr/bin/ls. The which command is also handy for quickly determining if a command is using an alias.
- The “whereis” utility locates a command’s program binaries as well as source code files and manual pages. In the image above we used the “whereis” command to searches for program binaries, source code files, and manual pages for the ls, cat and diff utilities.
The “locate” utility searches the database, mlocate.db in the /var/lib/mlocate/ directory to determine if a particular file exists on the local system. The syntax for the locate command is:
locate [OPTION]… …
The “locate” command uses a pattern list to find files so you can use partial names and regular expressions and case insensitivity to search. One issue you might find with the “locate” command related newly created/downloaded files. The “locate “utility is based on the mlocate.db database, not the virtual directory structure is typically updated only one time per day via the via the updatedb utility and a cron job. Therefore, if the file is newly created, locate won’t find it. You can run updatedb manually if you need to find a newly created file. The table below highlights the most popular options for the command.
| Short | Long | Description |
|---|---|---|
| -A | –all | Display file names that match all the patterns, instead of displaying files that match only one pattern in the pattern list. |
| -b | –basename | Display only file names that match the pattern and do not include any directory names that match the pattern. |
| -c | –count | Display only the number of files whose name matches the pattern instead of displaying file names. |
| -i | –ignore-case | Ignore case in the pattern for matching file names. |
| -q | –quiet | Do not display any error messages, such as permission denied, when processing. |
| -r | –regexp R | Use the regular expression, R, instead of the pattern list to match file names. |
| -w | –wholename | Display file names that match the pattern and include any directory names that match the pattern. This is default behavior. |
To find a file with the locate command, just simply enter locate followed by the file name. If the file is on your system and you have permission to view it, the locate utility will display the file’s directory path and name. As he locate command’s is simply a list, you can add additional patterns to it, just separate them with a space. If you do not have permission to view a directory’s contents, the locate command cannot show files that match your search pattern if they are in that directory.

When you use the “locate” command PATTERN, be aware of the utility’s default pattern file globbing, which occurs when using wildcards with file name argument; the result is that the file name expands into multiple names. By default, “locate” adds wildcards to the pattern; if you just want to search for the base name of a file, with no file globbing, you must add quotation marks (single or double) around the pattern and precede the pattern with the \ character. The image below shows what would happen if you allow the default file globbing to occur. Too many files are displayed for the search to be useful

In the image below, we turned file globbing off with the use of quotation marks and the \ character.

Using Intricate Pinpoint Commands
The use of simple commands doesn’t work well when you need to find files based on things such as metadata. but here are commands that can help. The “find” command allows locating of files based on data, such as who owns the file, when the file was last modified, permission set on the file, and etc with the following syntax:
find [PATH…] [OPTION] [EXPRESSION]
The PATH argument is a starting point directory, because you designate a starting point in a directory tree to search through recursively for the object in question; Alternatively, use a single period (.) to use the working directory as the starting point. Options for the “find” command handle such items as following or not following links and debugging. You can have a file deleted or a command executed if a particular file is located. See the find utility’s man page for more information on these features.
The EXPRESSION argument and its preceding OPTION control the application of metadata filters and limitations to the search. The table below highlights some of the options and expression you can use.
| Option | Expression | Description |
|---|---|---|
| -cmin | n | Display names of files whose status changed n minutes ago. |
| -empty | Display names of files that are empty and are a regular text file or a directory. |
|
| -gid | n | Display names of files whose group id is equal to n. |
| -group | name | Display names of files whose group is name. |
| inum | n | Display names of files whose inode number is equal to n. |
| -maxdepth | n | When searching for files, traverse down into the starting point directory’s tree only n levels. |
| -mmin | n | Display names of files whose data changed n minutes ago. |
| -name | pattern | Display names of files whose name matches pattern. Many regular expression arguments may be used in the pattern and need to be enclosed in quotation marks to avoid unpre- dictable results. Replace -name with -iname to ignore case. |
| -nogroup | Display names of files where no group name exists for the file’s group ID. |
|
| -nouser | Display names of files where no username exists for the file’s user ID. |
|
| -perm | mode | Display names of files whose permissions matches mode. Either octal or symbolic modes may be used. |
| -size | n | Display names of files whose size matches n. Suffixes can be used to make the size more human readable, such as G for gigabytes. |
| -user | name | Display names of files whose owner is name. |
Now let’s look at some examples of using the command.

The first example in the image above look for files in the current working directory’s tree with a “.txt” file extension. Notice the use of quotation marks with the -name option’s pattern in order to avoid unpredictable results. In the next example, a -maxdepth option is added so that the find utility searches only two directories: the current directory and one subdirectory level down. You can use the “find” command to audit your system on a regular basis ; audit the /usr/bin directory is being audited for the potentially dangerous SUID permission by using the find utility and its -perm option. The expression used is /4000, which will ask the find utility to search for SUID settings (octal code 4) and, due to the forward slash (/) in front of the number, ignore the other file permissions (octal codes 000).
After working through this section, knowing how to manage, files, directories and text in Linux will be valuable tool in your command-line tool belt


