


Learning how to secure a network with Linux is a wide ranging topic. Previously on Secur we’ve covered:
- Understanding Network Security Appliances
- Implementing Network Access Security
- How to Secure a Wireless Network
- How to Assess, Mitigate and Respond to Computer Network Threats and Vulnerabilities
In this article we are going to take a deeper dive into the nuts and bolts of the process.
How to Secure a Network with Linux
Securing a network with Linux involves knowing techniques for how to:
- Secure network services.
- Prevent information leakage.
- Test for open ports and perform port scans
- Manage Xinetd security.
- Secure SSH
- Configure local Linux firewalls.
Securing Network Services
What are Network Services
- Network services are sometimes called daemons (a program that runs continuously and exists for the purpose of handling periodic service requests).
- Listen on network ports for incoming connections
- Often the focal point of system attacks.
- Constantly running in the background.
- Output recorded in log files.
- Not connected to a terminal
- Some use var system log files
- Some use their own log files
- Check the config files
- Designed to perform a single task.
How to Secure Network Services
- Use a dedicated user for each service.
- Take advantage of privilege separation. If an account gets exploited, it can only impact a single service.
- Do not run services as root
- Ports below 1024 are privileged.
- Require superuser privileges to open.
- Use root to open them, then drop privileges.
- Configuration controlled by each service.
- Stop and uninstall unused services.
- Each service is an attack vector.
- Avoid unsecure services.
- Use SSH instead of telnet, rlogin, rsh, and FTP
- Do not use unencrypted services.
- Stay up to date with patches.
- Install services provided by your distro.
- Only listen on the required interfaces and addresses.
- Many default to listening to every network interface and address on the system.
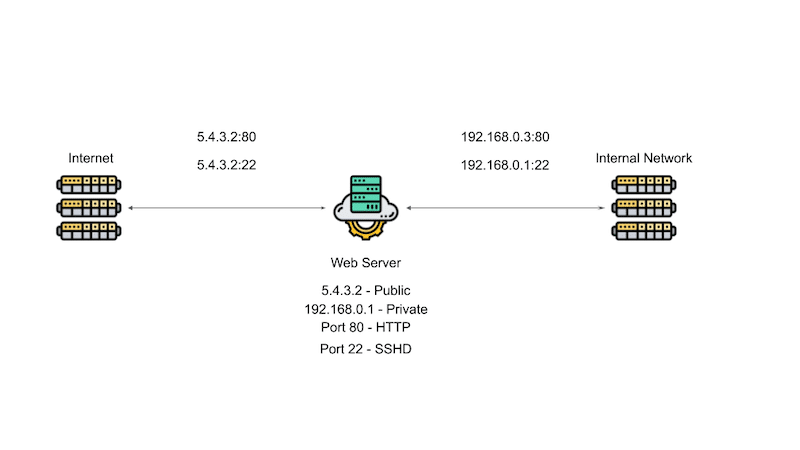
For example, say you are runninng a server that has a webserver running a process, you want to be able to log into the server to configure SSHD. Say the server has two connection, one on the public side (5.4.3.2) and one on the private side (192.168.0.2). If you allow SSH tto bind to all the addresses on your system, then SSH would be exposed to the outside world.
How Your SSH Set Up Should Look

As illustrated in the image above, since only people inside your company need SSH access, configure SSH to only listen on the private IP address of the server (192.168.0.1:22). Let the web server listen to both the public and private IP address to monitor the connection, but the point is by not exposing you SSH service to the public, you reduce your attack vector and increase your network security.
Adding a Database Service
Now say that your web server needs to store some data in a database and you put it on the same server (in this case MySQL). As seen in the diagram below, if you let the MySQL database listen on all ports, you expose it to the entire public internet, providing another attack vector.

As demonstrated in the image below, since no one from the public internet needs direct access to the database, you should configure the set up so that if someone needs information from the database, the user makes a web request and the web services accesses the database as needed. If the database is only being used by the web server, there may be no need for the database to listen on the private IP address either.

In the situation above, we bind the database to the server’s loopback address (127.0.0.1), an address that isn’t connected to any network and is used for internal server communications only. Configuring the database to listen on the internal IP address would allow for monitoring of the database. Using the internal loopback address ensures that data does not leave the server and off of the network.
Not only can you control which interface address a service listens on, as seen in the image below, you can use the linux firewall to further limit access to your system and its network services.
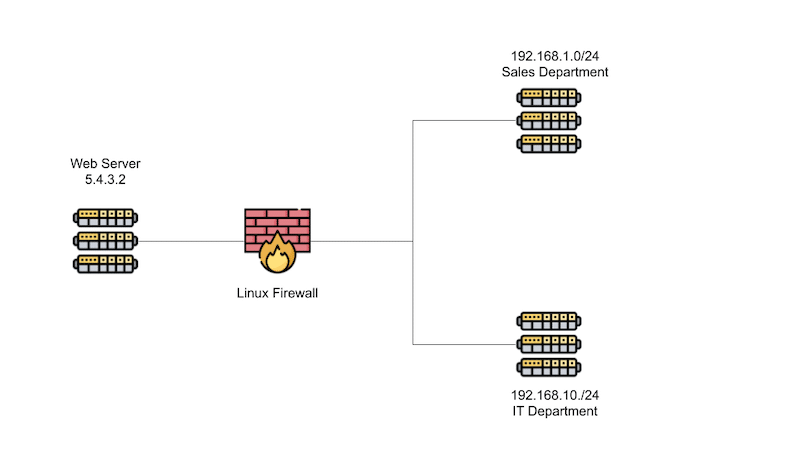
Say for example you want to limit SSH access to people who work in the IT department. you would configure the internal firewall to drop all traffic attempt to connect to SSH unless it comes from 192.168.10./24, the IT department’s network. If an attacker got into your network, they would still not have SSH access unless they broke into a system that had SSH access.
If you want another layer of protection, you can use TCP wrappers to define which hosts are able to connected to wrapped network services

Wrapped network services are services that are TCP wrapper aware. Once of the most popular wrapped services is XinetD, a super server that listens for incoming network request and then dispatches them to the appropriate service.
- If a request makes it past the firewall, then it is examined by TCP Wrappers.
- if it passes TCP Wrappers, the request is handed off to the the appropriate service.
- If the connection is bound to a service that directly supports TCP Wrappers, that connection is handed directly to that service.
- If the request is bound to a service that Xinetd manages, Xinetd start the subprocess and hands over the request.
- if it passes TCP Wrappers, the request is handed off to the the appropriate service.
Preventing Information Leakage
- Avoid revealing information where possible.
Web Server Information Leakage
As seen in the image above, you should avoid revealing information about your servers’ operating systems in the headers (web server banners). Other places that can leak server information are:
- Message of the day file – /etc/motd. This is displayed with a user logs inl
- /etc/issue: displayed before login prompt on the Linux console.
How Do You Tell What Services Are Running on Linux
If you are running SystemD can displaying the services that are currently running on your system with systemctl:

Obviously not everything listed in the image above is a network services, but you have some understanding of what is running on your system.
Stopping and Disabling SystemD Controlled Services
- systemctl stop
- Stopping a service stops it for now, but it will restart when the system rebootts/restarts.
- systemctl disable SERVICE
- Prevents a system from restarting when the system reboots/restarts.
List Listening Programs with netstat
Using the netstat will let you see which services are running.
In the image below, we run the netstat command, as sudo, with a number of flags (nutlp).

In the image above, the following flags were used:
- n: Displays the output in numeric form
- u: tells netstat to include the UDP protocol
- t: tells netstat to include TCP protocol
- l:diplays listening sockets
- p: displays the PID/Process name
You can also see that the snmp process is running on the loop back IP at port 161. If a service is only being used locally, bind it to the local host address.
Port Scanning
Another way to see if something is listening on your system is to run a port scan using something like nmap.
- nmap is called with a host name for an argument
- eg nmap 8.8.8.8
In the image below, Secur ran an nmap scan against a company by the name of Canopy Growth, a cannabis producer and generated a report of the open port on their system, 80 and 443.

Another option to look for open services is to use the lsof (list open files) command, as in the image below. Remember that practically everything on Linux is listed as a file.

Testing a Specific Port
- If you want to see if a specific port is reachable, use the telnet command with the host and address port.
- Historically used to log into systems, you can use telnet to connect to a port and send data to the port.
- You can also use the netcat command to attempt to connect to an open port like so:
nc -v
- The “-v” option indicates that netcat should run in verbose mode and print out if a connection failed or succeeded.
Xinetd Controlled Services
- While becoming less common, you may run into a service run by Xinetd.
- If you see an Xinetd process listing on a port, Xinetd will actually start the process that is responsible for that port and hand the connection to that process.
- To see a list of Xinetd supported services, look in “/etc/xinetd.d/SERVICE”. Each service will have its own configuration file.
- To disable a particular service:
- make sure there is a line in the file that says:
“disable = yes”
- To disable xinetd:
- systemctl stop xinetd
- systemctl disable xinetd
Securing SSH
- A network protocol that allows you to securely connect to a system over a network.
- SSH = Secure SHell.
- Allows for key based authentication as well with a username and password.
- To allow key authentication, make sure that the /etc/ssh/sshd_config file has the following line:
PubkeyAuthentication yes
- Please note that you need to reload the configuration for any changes to take effect with the following command on SystemD based Linux distributions:
- systemctl reload sshd
Creating SSH Keys
- As seen in the image below, use the ssh-keygen command to create an SSH key.

- As seen in the image above, when you use this command, you will be asked to create a passphrase for the key.
- This is optional, but requires anyone using your key to know the phrase, increasing the security.
- Makes automation hard
- The key generation process creates 2 files, a private and public key:
- ~/.ssh/id_rsa
- Never share this file.
- ~/.ssh/id_rsa.pub.
- ~/.ssh/id_rsa
SSH Key Risks
SSH keys provide the same level of access as user names and passwords, and are typically associated with privileged accounts with operating system access. When administrating SSH keys, consider:
- It is common that there are 10 times as many SSH keys as there are passwords.
- SSH keys have been ignored in most identity and access management projects.
- They require the same kind of provisioning/termination/audit processes as passwords or any other authentication method.
How to Add Your Public Key to a Remote Host
- To copy the public key to a remote system, use ssh-copy-id:
- ssh-copy-id [user@]host
- Adds public key to the remote host by appending it to the following file:
- ~/.ssh/authorized_keys
- Now you can authenticate into a remote server.
- Disable a login by removing the key from the file.
How to Force Key Authentication
- In order to prevent password based logins (and therefore brute force attacks), modify the /etc/ssh/sshd_config file by adding the following line:
PasswordAuthentication no
How to Modify SSH Root Logins
- To disable root logins modify the /etc/ssh/sshd_config file to include:
- PermitRootLogin no
- In order to allow root to login with a key but not a password, modify the /etc/ssh/sshd_config file to include the following:
PermitRootLogin without-password
How to Allow and Restrict SSH Access
Only Allow Certain Users SSH Access
- Use the AllowUsers command to list users who can use SSH to log in like so:
- AllowUsers
Only Allow Certain Groups SSH Access
- Use the AllowGroups command to list users who can use SSH to log in like so:
- AllowGroups
- Now only members of these groups can log in via SSH
Deny Certain Users or Groups SSH Access
- DenyUsers and DenyGroups commands will restrict SSH access to those named.
SSH Port Forwarding
- SSH can be used to forward TCP connections
- Say you have a MySQL database running on a server and is connect to the loopback address at 127.0.0.1:3306
- Outside connections will not be accepted because the database is not listening on an external port for connections.

As seen in the image above, you can have SSH forward connections from a port on your local machine to a port on a remote server. You can set this up by running “ssh -L 3306:127.0.0.1:3306 server“.
This allows you to use a MySQL client to connect to port 3306 on you local system which is forwarded to port 3306 at IP address 127.0.0.01 , the loopback address on the server.
- The advantage of this set up are that:
- You can use a client on you local machine to access a remote machine.
- Traffic is encrypted by ssh.
- Downside of this set up is
- There is a connection from the outside world to that server on port 3306. Unless the machine that is connected via SSH is using a local fire wall, someone could connect to the remote machine on port 3306 and get access to the database on the server.
Forwarding TCP Connections Via SSH

- You can use SSH to forward TCP connections through a system from port 8080 on your local machine through the server. To do this run this command:
- ssh -L 8080:google.com:80 Server
- Now Google thinks traffic is originating from the traffic.
- You can take this a step further with dynamic port forwarding
Dynamic Port Forwarding / SOCKS
- Let’s forward all web browser traffic through the server (see the image below).

- Run the command “ssh -D 8080 Server“.
- The “-D” option enables dynamic port forwarding
- Configure your web browser to use a SOCKS proxy, your local system address or 127.0.0.1 and port 8080
- Now all of your web traffic tunnels through the server
- If you don’t have a firewall on your local machine, an external device could attach to your machine and funnel its web traffic through the same server.
Reverse Port Forwarding

- You can use SSH to forward requests from the remote server to your local machine (as seen in the image above)
- To make the server listen on port 2222 and then forward all traffic back to the local machine on port 22 run the following command:
- ssh -R 2222:127.0.0.1:22
- You can now go out to a third location, connect to the the server on port 2222. The request would tunnel through to the desktop on port 22 and then you can access the internal network.
- This is another reason you should have a local firewall on your system
- assumes connections destination for 2222 make it to the server nd the server is not blocking the port.
Disable TCP Port Forwarding
- As you can see port forwarding can be a security risk. In order to turn it off, set the Allow TCP Forwarding flag to no.
- AllowTcpForwarding no
- If you allow port forwarding, make sure to shut off the GatewayPort option. This determine if remote clients are allowed to attached to forwarded ports.
- GatewayPorts no
SSHv2 vs SSHv1
- When possible, use the SSHv2 rather than SSHv1 as it contains several improvements.
- Stronger encryption and authentication
- Use the protocol configuration directive in the sshd config file followed by 2 (Protocol 2) to force version 2 of the ssh protocol.
Bind SSH to a Specific Address
- By default ssh will listen on all addresses on the system.
- If you want to control which IP address sshd binds to, use the ListenAddress directive and specify the IP to listen on. If you want to listen on multiple address, use multiple lines:
- ListenAddress
ListenAddress - You can use this in situations where you have both a public and private network that you want to listen to.
- ListenAddress
Change the Default Port
- By default, SSH runs on port 22
- If you want to change the port number, supply the new directive in the /etc/ssh/sshd_config:
- Port 2222
- Changing the port number reduces the number of attempted unwanted connections, but if an attacker is specifically targeting your system, it would be easy to do a port scan and find SSH.
Disable the Banner
- To avoid information leakage, you can use the Banner directive to display the contents of a file to a remote user before they are allowed to authenticate. This directive is found in “/etc.issue.net“.
- Try to disclose a little information about the operating system as possible
- To disable the banner, use the following directive:
- Banner none
Managing Linux Firewalls
- Firewalls control network access.
- Designed to block unauthorized access while allowing authorized access.
- Built in Linux firewall is comprised of two parts
- Netfilter: A kernel framework that provides a series of hooks in various points in a protocol stack
- IPTables: a packet selection system that gives your the ability to perform actions on IP packets.
- Use the iptables command to control the
firewall. You can use this command to create a set of firewall rules that allow you to control the network traffic originating from or coming to your Linux system.
- Use the iptables command to control the
Structure of IPTables
- Tables are comprised of chains.
- Each table can have multiple chains.
- Chains are comprised of rules.
- Each chain can contain multiple rules.
- There are no default rules and unlike chains and tables, you can create rules.
- Allows for the creation of an audit trail.
- 5 Standard Default Tables
- You cannot create your own tables.
- Filter: Most commonly used table.
- block incoming connections
- deny outgoing connections
- NAT: Network Address Translation.
- Maps one IP space into another.
- Allows a single IP address to be shared.
- Mangle: Alter packets.
- change the ttl (Time To Live).
- Raw: Used to disable connection tracking.
- Rarely used.
- Security: Used by SELinux for mandatory access controls.
- Default Chains
- Each table comes with a set of default chains.
- Chain names are case sensitive.
- INPUT
- OUTPUT
- FORWARD
- PREROUTING
- POSTROUTING
Built in chains used by each table
| Filter Table | |||||
| NAT Table | |||||
| Mangle Table | |||||
| Raw Table | |||||
| Security Table |
Packet Paths

Looking at the diagram above and assuming there are no rules that stop packets along the way:
- Inbound packets: go through prerouting and input chains before reaching the local system
- Inbound packet destine for another host: packets go through prerouting, forward and post routing chain before leaving.
- Outbound packets: Go through output and postrouting chains before leaving the network.
When you combine the chain traversal order with the tables in which they are used, you get a complete picture of a path that a packet takes through a computer system in the image below.

- Any incoming packet starts at the top of the diagram and follows this route:
- Into the nat Table and the PREROUTING chain
- From here is is either directed to the local system or it is going to be forwarded.
- If destined for the local system, then the packet goes to the INPUT chain of the filter Table.
- If the packet comes from the local system then it will transverse the nat Table‘s OUTPUT chain followed by the filter Table‘s OUTPUT chain
- From there it goes to the POSTROUTING chain of the nat Table and leaves the system.
Firewall Rule Specifications
- Now that we know the path that packets take through the system, you can start creating rules and putting them in tables and chains
- Rules are comprised of a match and a target.
- Rules = Match + Target
● You can match a packet several different ways.- Match on:
○ Protocol
○ Source/Dest IP or network
○ Source/Dest Port
○ Network interface that a packet comes in or out of the system on.
○ You can make simple rules, or more complex one by using a one criteria like this:- protocol: TCP, source IP: 8.1.3.4, dest port: 80
- This rule matches TCP packets from the IP address 8.1.3.4 address and are destined for port 80. If a packet doesn’t match all three rules, it is not considered a match and the packet is examined by the next rule in the chain.
- Match on:
- Rules = Match + Target
Firewall Targets
- The target section of a rule determines what happens to a packet that is matched. The target can be:
- The name of a chain
- Built in target, which include:
- ACCEPT: Used to accept a packet and stop processing rules in the chain
- DROP: Silently ignores the packet and stops processing the rules in the chain.
- REJECT: Like the drop target except that it notifies the sender the packet was not accepted.
- LOG: Use the log target to log the packet using the system logger and continue processing rules in the chain
- RETURN: Causes the current packet to stop travelling through the current chain. If this happens in a subchain, the packet returns to the calling chain. If the packet is in the main chain, like the INPUT chain, the default policy of that chain will be applied.
iptables / ip6tables
- We now have all the background information we need to implement a Linux firewall.
- Command line interface to IPTables/netfilter uses the “iptables” (“ip6tables” if using IPv6 ) command.
- You can specify a table with the “-t” option followed by the table name.
- If you dont specify a table, it is assumed you want the filter table.
- Use “iptables –line-numbers” prints out the line numbers


Built in Chain Policy / Default Target
- The built in chains of a default policy if a packet reaches its end. The policy is really just a target
- In order to set the default TARGET for CHAIN:
- iptables -P CHAIN_NAME TARGET
- Example: iptables -P INPUT DROP
- FORWARD and OUTPUT chains have a default policy of ACCEPT
- If there are no rules, packets that traverse the FORWARD and OUTPUT chains are automatically accepted.
Appending, Inserting, and Deleting Firewall Rules
- iptables -A NAME_OF_CHAIN RULE-SPECIFICATION
- Appends a rule to the end of a chain.
- iptables [-t TABLE] -A NAME_OF_CHAIN RULE-SPECIFICATION
- The filter TABLE is assumed unless you use the “-t” option and name the table.
- You can use the “-t” option with the commands below as well
- iptables -I NAME_OF_CHAIN [RULENUM] RULE-SPECIFICATION
- Inserts a rule at the beginning of the chain.
- iptables -D NAME_OF_CHAIN RULE-SPECIFICATION
- Deletes a chain.
- iptables -D NAME_OF_CHAIN RULENUM
- Also deletes a chain.
- iptables [-t table] -F [NAME_OF_CHAIN]
- Flushes/deletes
Common Firewall Matching Specification Options
| -s SOURCE -s 10.11.12.13 -s 10.11.12.0/24 -s 10.11.12.0/255.255.255.0 |
|
| -d DESTINATION -d 192.168.4.11 -d 216.58.192.0/19 -d 216.58.192.0/255.255.224.0 | Destination IP, network, or name*. |
| -p PROTOCOL -p tcp -p udp -p icmp | Matches a packet by protocol |
| -m MODULE MODULE_OPTIONS |
|
| -p PROTOCOL -m PROTOCOL –dport PORT -p tcp -m tcp –dport 80 -p tcp –dport 80 -p udp –dport 53 |
|
| -p PROTOCOL -m PROTOCOL –sport PORT -p tcp -m tcp –sport 8080 -p tcp –sport 8080 | Source port You can do the same thing with source ports as you do with destination ports. |
| -p icmp -m icmp –icmp-type TYPE -p icmp -m icmp –icmp-type echo-reply -p icmp –icmp-type echo-reply -p icmp –icmp-type echo-request | ICMP packet type
|
| -m limit –limit rate[/second/minute/hour/day] -m limit –limit-burst -m limit –limit 5/m –limit-burst 10 -m limit ! –limit 5/s | The limit module is used to match packets based on rate. For example you can match all packets that do not exceed a given rate. You can use this module to control how often logs are written or to limit the effects of a denial of service attack. The limit burst count is reset every time the limit rate is not broken if you don’t specify a limit.
|
Firewall Target/Jump Specifications
- Relatively simple
- Specify a jump point or target:
- -j TARGET_OR_CHAIN
- The target can be a built in or custom chain
- Think of targets as jumps.
- When “-j” is encountered, the matching packet will jump to the specified target.
- -j ACCEPT # Built-in target.
- -j DROP # Built-in target
- -j LOGNDROP# Custom chain.
- When “-j” is encountered, the matching packet will jump to the specified target.
Firewall Rule Specification Examples
Block Traffic From an IP (219.58.219.124)
- iptables -A INPUT -s 219.58.219.124 -j DROP
- -A: Appends the rule that follows it.
- Since no table was stated, the filter table was assumed
- -s: Indicates the source address.
- -j: The target of where to jump to, in this case drop.
- When you look at the image below, you will see that the destination is 0.0.0.0/0 which means anywhere.

All Internal Network Traffic Can Connect To SSH
- iptables -A INPUT -s 9.0.0.0/24 -p tcp –dport 22 -j ACCEPT
- iptables -A INPUT -p tcp –dport 22 -j DROP
- This rule accepts TCP packets destines for port 22 from the 9.0.0.0/24 network
- This will allow SSH connections from that network
- The second line appends a rule that blocks all inbound connections to port 22. This is one way to allow SSH connection from your network but block all other SSH connections.
- If a packet is matched jumps to its target,
- If it does not match, it goes to the next rule in the chain.
Adding a rule to the INPUT Chain
- iptables -I INPUT -p tcp –dport 80
- This rule limits tcp packets that are destined for port 80, one way you can fight against a DoS attack on your webserver.
- iptables -m limit –limit 50/min –limit-burst 200 \ -j REJECT
- The second rule is more specific in that it uses the state module to only match new connections.
- Netfilter provides connection tracking so it knows if a connection packet is a new packet or part of an established connection.
Creating and Deleting a Chain
- Create a custom CHAIN:
- iptables [-t table] -N CHAIN
- If no table is given, the chain is applied to the filter table.
- iptables [-t table] -N CHAIN
- Delete CHAIN:
- iptables [-t table] -X CHAIN
Saving Rules
- The iptables command allows you to modify firewall rules in real time, but they do not persist between reboots.
- This works by dumping the running rules to a configuration file. This configuration file is used to load the rules when iptables services starts at runtime.
- Commands for a Debian/ Ubuntu system (need to get the iptables-persistent package):
- apt-get install iptables-persistent
- netfilter-persistent save
- This saves the commands to the /etc/sysconfig/iptables file.
- Commands for a CentOS / RedHat system:
- yum install iptables-services
- service iptables save
Netfilter/iptable Front-Ends
- Uses iptables command on the back-end
- Firewalld – CentOS/RHEL
- UFW – Uncomplicated FireWall (Ubuntu)
- GUFW – Graphical interface to UFW
- system-configure-firewall – CentOS/RHEL
TCP Wrappers
- TCP Wrappers are host-based networking ACL system.
- Controls access to “wrapped” services.
- Unlike a local linux firewall, which blocks any connection as a whole.
- TCP Wrappers only control access to wrapped services
- A wrapped service is compiled with libwrap support.
- To determine if a services is wrapped, you can run the ldd command against it.
- ldd – Prints required shared libraries by a given program to run. In the example below, you can see that the sshd file is wrapped with libwrap.
- This means the file will honor any TCP ACL’s put into place.
- ldd – Prints required shared libraries by a given program to run. In the example below, you can see that the sshd file is wrapped with libwrap.

- Can control access by IP address / networks.
- Advantages to using TCP Wrappers
- Can control access by hostname.
- Transparent to the client and service.
- Used with xinetd.
- One of the most popular wrapped services
- A super server which listens for income network requests and dispatches them to the proper services
- Centralized management for multiple network services.
- For example if you wanted to control access to sshd, imap d and services that are xinetd controlled, you can do it all from one place.
- Runtime configuration so changes take effect immediately.

- In the image above, we see the path a packet takes, If it makes it passed the firewall, it is examined by TCP wrappers, the connection is handed off to the correct service.
- If the connection is bound to service that service that supports TCP wrappers, it is handing off directly to that service.
- If it bound to a service that xinetd manages, xinetd starts the subprocess and hands over the request to it.
Configuring TCP Wrappers
- Two access files involved in configuring TCP Wrappers
- /etc/hosts.allow
- Is checked first.
- If a match is found for the incoming connection, access is granted.
- /etc/hosts.deny
- checked next if no match is found.
- If a match is found, access is denied.
- Writes to the log file(/var/log) saying the connection was refused
- If there are no matches, access is granted.
TCP Wrapper Access Rules
- The rule format for hosts.allow and hosts.deny are the same.
- One rule per line
- Format: SERVICE(S) : CLIENT(S) [: ACTION(S)_TO_TAKE_UPON_MATCH]
- SERVICE(S): The services portion of the rule is actually the same name of the process that runs and accepts the network connections, for example sshd (not ssh) accepts the connection.
- SERVICE(S) : CLIENT(S) [: ACTION(S) ]
sshd : 10.12.11.14
sshd, imapd :10.12.11.14 (separate multiple services with a comma)
ALL : 10.12.11.14 (applies the same action to all TCP wrapped services
- SERVICE(S) : CLIENT(S) [: ACTION(S) ]
- the client list can contain a hostname or network specification
- SERVICE(S) : CLIENT(S) [: ACTION(S) ]
sshd : 10.11.12.13
sshd : 10.11.12.13, 10.5.6.7 (if you want to provide more than one client, separate them by commas)
sshd : .stuff.com (You can use wildcards here as well. This will match any SSH connections from any client at the “stuff.com” domain. Starting a host name with a “.” will match any host sharing the same components listed in the rule. This rule will also match: cookies.stuff.com and icecream.stuff.com.
sshd : 11. (matches any host that starts with 11)
sshd : 11.12.0.0/255.255.0.0 (using ip address and subnet mask)
sshd : /etc/hosts.sshd (Can use a list of hosts you can connect to)
imapd : ALL (Can use the “ALL” keyword too. Any clients connecting to the imapd process.)
sshd : ALL EXCEPT .spam.net (Allows connections from any site but this one).
- # SERVICE(S) : CLIENT(S) [: ACTION(S) ]
- Use the action portion to determine what action gets taken
- # SERVICE(S) : CLIENT(S) [: ACTION(S) ]
sshd : 11.12.13.14 : severity emerg (only emergency messages get written to the logs. This generates an emergency message when an SSH connection is attempted from this IP)
sshd : .spam.net \
: spawn /usr/bin/wall “Spamming in progress.” (use the spawn directive to spawn a new action/command when an event occurs.
Simple Configuration to Deny All
- Start by denying every connection via the host.deny file
- Explicitly list allowed connections
- /etc/hosts.deny:
- ALL : ALL
- /etc/hosts.allow:
- sshd : 11.12.13.14


