Due the the combination of both the ubiquitous of the internet and its role in the structuring huge amounts of data, nearly everything done on the internet is tracked. Understanding how to navigate the web is an essential skill for almost anyone in this day and age. This article covers a number of ways you can decrease the exposure of your personal details online by making use of the the following tools:
- The Onion Network (TOR);
- Proxy servers;
- Private Email Services; and,
- Virtual private networks (VPN).
Understanding Online Privacy
No single method keeps your activities 100% hidden from being tracked on the internet, and with enough resources, anything is trackable, however, there are tools that make tracking more difficult.
Why You Can’t Hide On the Internet
To begin, let’s discuss at a high level some of the ways our activities on the internet are tracked.
Understanding Your IP Address and Packet Networks
Your public IP address identifies you as you send data/receive data across the internet. Data packets from your machine are labelled your IP address as well as that of the destination computer/network, making web surfing activities easy to track. Every packet knows where it is going and where to return the response; It “hops” through 15 to 30 internet routers until it finds its destination and then the response hops back to the sender.
As packets hop across the internet, intercepting the packet allows you to see the sending party, where it has been, and its destination . This is the basis of how websites tell who visitors are when they arrive and log you in automatically.
With the “traceroute” command, you can see what a series packet hops a packet might make between you and the destination. Let’s run a traceroute to CNN’s website so you can see packet hops in action.

To use “traceroute” enter the command and the destination IP address/ domain, and the command sends packets to the destination and trace the route of those packets.
Except when it doesn’t…..
As you can see, the first attempt to run a traceroute to cnn.com failed. This is because on On some Linux machines, traditional traceroute methods can not be always applicable, because of widespread use of firewalls. Such firewalls filter the “unlikely” UDP ports, or even ICMP echoes, so you can try using traceroute -T to use TCP rather than ICMP or use the -I option, like we did above.
As you can see, www.cnn.com is 9 hops across the internet from me. Your results will likely be different because your request would be coming from a different location and because CNN has many servers across the globe. In addition, packets don’t always take the same route across the net. Read this article to learn more about traceroute.
Privacy Tools
Now that we have an understanding of how traffic traverses the Internet and exposes your personal data, let’s explore how we can protect better.
The Onion Router System
In the 90’s, the US Office of Naval Research wanted to develop a method of using the internet anonymously for espionage. “The Onion Router (Tor) Project”, which went live in 2002, involved setting up networks of routers which were separate from the routers used on the internet. These routers encrypt the network traffic, and only stored the unencrypted IP address of the previous router, so that the originating ip addresses of the traffic was obfuscated with encryption. This network architecture provides security as that anyone sniffing the network traffic can’t determine the origin or destination of the data.
How Tor Works
Packets sent over Tor sent over a network of over 7,000 routers that are run by volunteers, rather than the regular routers that are monitored and maintained by large companies and government agencies. In addition to a separate router network, Tor encrypts the data, destination, and sender IP address of each packet. At each hop, the information is encrypted and then decrypted by the next hop when it’s received. In this way, each packet contains information about only the previous hop along the path and not the IP address of the origin. If someone intercepts the traffic, they can see only the IP address of the previous hop, and the website owner can see only the IP address of the last router that sent the traffic, which ensures relative anonymity across the internet.

Getting Started with TOR
Installing TOR on a Linux Machine
On Kali systems, you cannot execute Tor as the root user for security reasons, so make sure you add a new user with sudo privileges and switch to that user before doing any of the following (we created a user named “Josh”). First step involves install the Tor browser from the Tor Project and make sure you select the right version based on your operating system. However before we install the application, we are going to verify its authenticity to ensure it has not been modified as it moved across the internet.
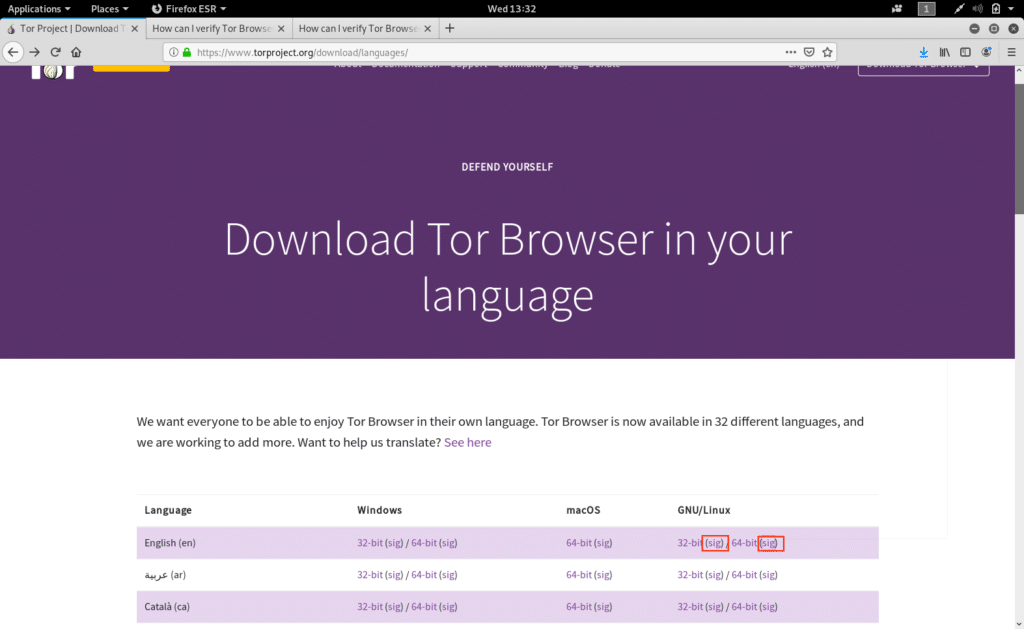
Verifying the TOR Download
The developers of TOR provided a signature file on the download page (see the image below). This “sig” file is unique to this download and was generated by the developers when they generated the download package and can be used to verify that the package did not get modified.
Step 1: Download the “sig” file.
Step 2: First of all you need to have GnuPG installed before you can verify signatures. If you are using GNU/Linux, then you probably already have GnuPG in your system, as most GNU/Linux distributions come with it preinstalled.
Step 3: Following the directions shown here, the next step is to fetch the Tor Developers key and then run the following command:
gpg --auto-key-locate nodefault,wkd --locate-keys torbrowser@torproject.org

Step 4: After importing the key, save it to a file with the following command.
gpg --output ./tor.keyring --export 0xEF6E286DDA85EA2A4BA7DE684E2C6E8793298290
If things are working properly, you will not get a response from the system other than a command prompt.
Step 5: Verify the signature of the package with the “.asc” file that we downloaded before as well as the application file itself by running this command (note that sometimes the file versions numbers may be higher than shown before):
gpgv --keyring ./tor.keyring ~/Downloads/tor-browser-linux64-10.0_en-US.tar.xz.asc ~/Downloads/tor-browser-linux64-10.0_en-US.tar.xz
The response of the verification should look something like this:

The positive response means that the package has not been modified in anyway.
Step 6: Uncompress the file and switch to that uncompressed directory. Keep navigating down the directory tree until you get to the executable file as seen in the screenshot below.

As this user, type in the following command to get the Tor Browser up and running:
./start-tor-browser.desktop
Once installed, it will look like the image below and you can use Tor like any internet browser.

Using Tor
When using Tor, you navigate the internet through a separate set of routers and will be able to visit sites without being easily tracked. This does come with a tradeoff in that using the Tor browser is slower due to a smaller number of routers, which limits the speed of the network.
Tor and the Dark Web
In addition to accessing traditional websites, the Tor browser is capable of accessing the dark web, which require anonymity, so they allow access only through the Tor browser. The dark web, infamous for illegal activities, have addresses ending in .onion for their top-level domain (TLD). While there are a number of legitimate services available on the dark web, you may come across material that many will find offensive.
Security Concerns
Many governments consider the Tor network a threat to national security as an anonymous network enables adversaries to communicate without fear of being eavesdropped upon.
Government authorities have broken Tor’s anonymity; Numerous government agencies runs their own Tor routers, so that traffic traverses these routers when using Tor. If traffic exiting a government run router, that’s more dangerous, because the router from which traffic exits always knows the final destination. Tor’s anonymity can also be circumvented by using “traffic correlation“, which looks for patterns in incoming/outgoing traffic, that has been able to break Tor’s anonymity. Having said all that, these issues do not affect Tor’s ability to shield your identity from commercial services, such as Bing/Yahoo/Google.
Proxy Servers
A proxy server acts as a gateway between your computer and the internet. Serving as intermediary separating end users from the websites they browse, Proxy servers provide differing degrees of functionality, security, and privacy depending on your requirements. Choose your proxies wisely and iff you are intent on remaining anonymous, do not use a free proxy as are likely selling your IP address and browsing history. As Bruce Schneier, the famous cryptographer and security expert, once said, “If something is free, you’re not the customer; you’re the product.” In other words, any free product is likely gathering your data and selling it. Why else would they offer a proxy for free?
Although the IP address of your traffic leaving the proxy will be anonymous, there are other ways for surveillance agencies to identify you. For instance, the owner of the proxy will know your identity and, if pressured enough by espionage or law enforcement agencies with jurisdiction, may offer up your identity to protect their business. It’s important to be aware of the limitations of proxies as a source of anonymity.
When using a proxy server, internet traffic flows through the proxy server on its way to the address you requested. The request then comes back through that same proxy server and then the proxy server forwards the data to your machine.
Linux has a build in library that allows users to use proxies to achieve anonymity while using the internet is to use proxies; As seen in the diagram below, users connect to a proxy, and the traffic inherits the IP address of the proxy before it’s passed on to the Internet. When the traffic returns from the destination, the proxy sends the traffic back to the source. In this way, traffic appears to come from the proxy and not the originating IP address.

As a matter of practice, and unless otherwise indicated, assume that proxy servers log your traffic, but authorities have to get a subpoena or search warrant to obtain the logs. Using a proxy chain (connecting more than one proxy) makes your traffic even harder to trace.
Some Linux distributions, like Kali, come with a library named “proxychains” you can use to obfuscate your Internet traffic.
Setting Proxies in the Config File
Let walk through setting up some proxies to use with the proxychains library. Proxychains configuration is performed by the config file, /etc/proxychains.conf. Using a text editor to open the config file, you will see something similar to the screenshot below.

The most important section of this file is the the ProxyList section seen in the screen shot below:

Add new proxies by entering the IP addresses and ports of the proxies we want to use in this list. As we are just learning, we will experiment with free proxies. Free proxy resources include:
Fill in the details in the form on either site; then add one of the
resulting proxies to your proxychains.conf file as seen in the screenshot below:

In the last line of the screenshot above, you will see that Proxychains defaults to send traffic to the Tor network (127.0.0.1: 9050) if no proxies are entered. If you want to avoid using Tor, comment out this line.
You will have to play around with adding and removing proxies to get familiar with how the program works and learn the nuances of proxies and Tor. My suggestion is to have three terminal windows open, with the following in each one:
Terminal Window 1: Open proxychains.conf with nano so you can edit proxies and tor settings;
Terminal Window 2: Use this window to start and stop tor. Make sure you have Tor installed. If you don’t have Tor installed run:
apt install tor
After Tor is installed, you can toggle it on and off with:
service tor start
service tor stop
Terminal Window 3: Use this window to execute the proxychains command. This window will show a stream of the DNS calls in real time, so you can see how things work.
Using Proxychains
Make Sure That Proxychains Work with Tor
The proxychains.conf file has a few proxies added to it, but I have commented it out to ensure we drive all traffic through Tor.

In order to use proxychains, all you need to do is run the command:
proxychains firefox
You can add the URL to the command, but we want to see all the DNS calls so we are going to just open a browser.
In this first scenario, we will start with Tor OFF. We will confirm that Tor is off by running:
service tor stop
And now we get proxychains up and running:
proxychains firefox
In the screenshot below, you can see that the calls from our Tor address “127.0.0.1:9050” all fail.

Now, let’s turn Tor ON by running:
service tor start
And now we get proxychains up and running:
proxychains firefox
Now surf over to Google.com:

In the image below, you will start seeing successful DNS requests from our Tor IP (127.0.0.1:9050) to various services running on Google.com, so we can say that our traffic is running through Tor. If you want to confirm this, perform an IP check.

Make Sure That Proxychains Work with Proxies
In the next step, we are going to confirm that proxychains is running through the proxies we added. One of the biggest challenges is that sometimes proxies go down and will cause your internet connection to fail. We can only use one of these three options at a time, so make certain you comment out the other options before using proxychains. A warning: This can be challenging when just learning about using proxy chains, so we are going to do it bit by bit:
Get Proxychains Working with One Static Proxy
Before you get start on this, be aware that this is a learning process and you will spend some time trying different proxy addresses. It will take you some time to find a working proxy. In writing this article, I tried about 3 or 4.
- In the proxychains.conf file, we need to make a few changes:
- Put in a single proxy address. We got this to work with socks4 93.91.146.30 port 34350 – which is in the Czech Republic;
- Make sure the “strict_chain” line is uncommented;
- Uncomment out the “dynamic_chain” command; and,
- Comment out the Tor network address.
- Turn the Tor Service Off;
- Launch proxychains;

When the browser opens, we punch in Google.com and the screenshot below shows what we get:

The screenshot below shows the traffic flowing through the proxy. As we have shut Tor off and commented out the Tor proxy, we know for sure traffic is going through the Czech proxy.

In order to test this a bit more, let’s navigate over to CNN and watch the traffic.

This next screenshot show the traffic running through the proxy when we hit the CNN site.

And just for good measure, we do an IP address check to confirm the we are surfing the internet from the Czech Republic.

Dynamic Chaining
If we add multiple IPs in our proxychain.conf file (if you look back through the images, you’ll see that we did do this, but commented them out), we can set up dynamic chaining, which runs our traffic through every proxy on our list and, if one of the proxies is down or not responding, automatically goes to the next proxy in the list without throwing an error. If we didn’t set this up, a single failing proxy would break our request.
While we already did this above, in case you missed it or decided not to do it, find the dynamic_chain option, and uncomment it, and comment out the strict_chain line if it isn’t already. If you uncomment the “strict_chain”, your system won’t skip failing proxies
This will enable dynamic chaining of our proxies, thus allowing for greater anonymity and trouble-free hacking. Save the config file and feel free to try it out.
Random Chaining
Another use of proxychains is making use of the the random chaining option; proxychains will randomly choose a set of IP addresses from our list and use them to create our proxy chain. As a result, each time proxychains is used, the proxy will look different to the target, making it harder to track our traffic from its source. This option is also considered “dynamic” because if one of the proxies is down, it will skip to the next one.
In order to test this out, open the /etc/proxychains.conf file, comment out the lines dynamic_chain and strict_chain with a # at the start of each line and then uncomment the random_chain line. See the screen shot below for the necessary changes.

The next step is uncommenting the line with chain_len and then give it number that determines how many of the IP addresses in your chain will be used in creating your random proxy chain. In our example, we have set it at 2, as you can see in the screenshot.

We have used the following IP addresses in proxychains.conf
socks4 93.91.146.30 34350
socks4 71.122.164.51 54321
socks4 82.137.224.193 8291
We then opened up google.com and CNN and watched the DNS requests. You can see some of them in the following two screen shots. What you will notice is that even though we managed to get to the websites, it was slower than usual and a large number of the calls timed out
The syntax for using proxychains with any application is simple:
proxychains “command to proxy” “arguments/options associated with command being proxied”
This executes the command through a proxy chain build by the proxychains application. As stated earlier, this will run slower than expected.
Private Email Services
Most free email services like, Outlook, Google and Yahoo “read” your email, looking for keywords against which to ads and if you are looking to reduce your online footprint, making use of an encrypted email services is a good place to start, as it will limit the tracking of your interests. Additionally, the servers of the free email provider have access to the unencrypted contents of your email, even if you’re using HTTPS.
In order to prevent this intrusion, you need to use an encrypted email like ProtonMail, which began development by a team of CERN Large Hadron Collider scientists in the wake of the 2013 Snowden leak. ProtonMail promotes itself as #1 most-used secure email service with over five million users. Protonmail encrypts email from end to end or browser to browser so your email is encrypted before it is sent to the ProtonMail servers and ProtonMail administrators are unable to read your email. According to ProtonMail, their servers are locked down under 1,000 meters of solid rock, in a Swiss bunker that can survive a nuclear attack. And its digital security is about as impressive.
Designed with the principles of zero access and zero knowledge, Protonmail’s servers and staff have no way of reading or sharing your emails.
Based in Switzerland, ProtonMail data is protected by the Swiss Federal Data Protection Act (DPA) and the Swiss Federal Data Protection Ordinance (DPO), which offers some of the best privacy protection in the world. In the unlikely case ProtonMail was ordered to hand over user data, it would have to be specifically subpoenaed by the Cantonal Court of Geneva or the Swiss Federal Supreme Court. And, even if user data were seized, it would be impossible to decipher because of ProtonMail’s encryption.
As ProtonMail’s encryption and web interface are open source, you along with security experts are free to audit and confirm its high levels of security.
Virtual Private Networks
Virtual private networks (VPN) keep your web traffic anonymous and secure by connecting to intermediary internet routers that send your traffic to its final destination tagged with the IP address of the router. As will all of the techniques mentioned in this article, there is no 100% guarantee of anonymity. The VPN you connect to records/logs your IP address in order to properly send the data back to you, so anyone able to access these records can uncover information about you.
VPNs are simple and easy to work with, simply open an account with a VPN provider and then connect to the VPN each time you log on to your computer. You use your standard web browser to navigate the web, but it will appear to the sites your visit or anyone sniffing the packet stream that your traffic is coming from the IP address/location of the VPN, not your own.
Usually (which means you should verify this for yourself) traffic between your computer and the VPN device is encrypted via an https connection, so your internet service provider can’t see your traffic.
The benefit of using a VPN is that your:
- Traffic is encrypted upon leaving your computer, protecting you from prying eyes; and,
- IP address is cloaked by the VPN IP address when you visit a site.
VPN operators have your originating IP address and are in a position to potentially reveal your identity. You can prevent this situation by using VPNs that do not to store/log any of this information so that data doesn’t even exist, so there is nothing to turn over to authorities.