All around security geek, editor-in-chief and janitor.
Share This Post:
Share on facebook
Facebook
Share on twitter
Twitter
Share on linkedin
LinkedIn
Understanding how to use Tor is essential if you are looking to reduce your online exposure and keep your web surfing private.
Tor Overview
Network of servers designed to improve anonymity and privacy;
Most common anonymizing network;
Connected computers can be configured to offer hidden/onion services; and
Onion routing was designed by the US Navy to protect their communications.
What is the Tor Browser
The Tor Browser:
Is based upon Firefox ESR;
Disables all Javascript as it can be used to deanonymize you;
Is fully patched;
Uses the Tor network by default;
Forces all connections over HTTP; and,
Has the insecure plugins removed from it.
Using the the Tor Web Browser provides users with two benefits:
It anonymizes your web traffic using the Tor network, making it easy to protect your identity online; and,
You can visit sites on the dark web. Tor Browser gives you access to .onion web sites that are only available within the Tor network. This makes it possible to read the news anonymously, a desirable feature in a country where you don’t want the government knowing about your online activities.
Having said that, you should be forewarned of a number of disadvantages of browsing via Tor :
It is a slower experience than you are used to;
Some major web services block Tor users.; and,
It may be illegal in authoritarian regimes that want to prevent citizens from reading, publishing, and communicating anonymously.
How Does Tor Protect
Your Identity
Tor Browser routes all your web traffic through the Tor network, anonymizing it. As the images below illustrate, Tor consists of a three-layer proxy, like layers of an onion (hence Tor’s onion logo). Tor Browser connects at random to one of the publicly listed entry nodes, bounces that traffic through a randomly selected middle relay, and finally spits out your traffic through the third and final exit node.When you visit a website (Google/Bing/Pornhub/Reddit/Facebook/etc), at the very least, your browser tells the host system your location, your browser and your operating system. Additionally, because you probably use a search engine like Google or Bing, they know your entire search history and potentially access your activities on other sites via things like log in services and share buttons. This information can be gathered, correlated and aggregated and used for a number of marketing activities.
Tor can help you prevent this by routing your requests through three different nodes before it hits it final destination, so the only thing the destination web server knows about you is your last IP address, which was from a node on the Tor network. Any exit node on the Tor network may be sending out 1000’s of requests per second, so tracking web traffic/requests becomes challenging. Data sent within the Tor also encrypted. The only time when data is unencrypted is when it enters/leaves the Tor network, unless you are forcing HTTPS usage to encrypt data leaving the Tor network. Also, be aware that when you are sending data to Tor, your ISP will know you are attempting to access Tor, but not see the traffic you are sending/receiving.
What are Hidden Services
Nodes (also referred to as connected devices) on the Tor Network can host websites/services and since they are part of Tor, they provide a high degree of anonymity. These are referred to as Hidden or Onion Services. While similar to regular websites, they utilize the Tor protocol that hides the identity of the server providing the services as well as the that of the client, so neither the client nor server have any knowledge of one another’s identities.
How to Use Tor
Although it is possible to route all of our traffic across Tor, which we do when running some versions of proxychains (click here to learn how to do it), there are significant problems associated with doing so:
Speed drop;
Data leaks; and
Lack of data encryption;
The solution to this is using:
Tor Browser;
Tails; or
Qubes with whonix.
The best way to protect yourself is to use an operating system designed for privacy, like Tails or Qubes, but that requires a level of technical proficiency beyond most users.
How to Install the Tor Browser on a Mac
One important note before you start following this process. When it comes to launching Tor, never maximize it as using standard browser sizing increases the chances of you being tracked online.
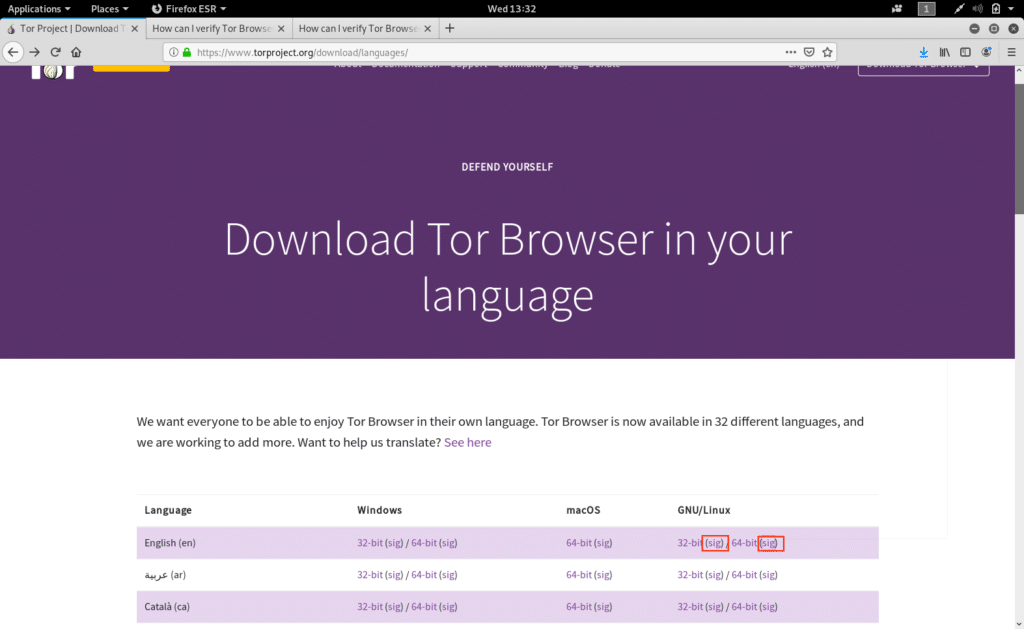
Step 1: Download the software package and sig files: Head over to the Tor download page, as seen in the image below and click on both the “64-bit” and “sig” files. This “sig” file is unique to this download and was generated by the developers when they generated the download package and can be used to verify that the package did not get modified. You may need to right click and “save as” on the sig file in order to download it.
Locating the “sig” file that you will use to verify the authenticity of your Tor package for Mac.
You could just double click on the downloaded DMG to install it, but this skips the most important step of this process, verifying that your file has not been modified in transit. When you download a file, it passes through a number of routers, giving a malicious party plenty of opportunity to modify the file in transit.
Step 2: Verify the file: When the software you just downloaded was created, the developers also created a signature file that can be used to determine if the file has been modified. We downloaded the “sig” file in step one. All we need to do is verify the sig file corresponds to the DMG file. If they do not correspond, then the DMG file has been modified and you should not install it.
This requires the downloading of GPG Suite. After you download and install GPG you can close the application windows that it opens up.
You then need to get a copy of the “signature” the developers used to sign the package. This can be found on this page. Open up a terminal window and follow the instructions laid out on the page.
Verifying Tor Developer signature file before installing Tor Browser on a Mac
After importing the key, you can save it to a file (identifying it by fingerprint here):
As an additional security measure, you can fingerprint the key
gpg –fingerprint 4E2C6E8793298290
The red boxes highlight the fingerprint of the developer’s key.
Now compare this fingerprint to the fingerprint on the developers page, which we have highlighted with the red box in the image below:
The red box highlights the footprint of the developers key on the download page of Tor.
As the finger prints match, we know for sure we added the correct key, we can now verify the installer we just downloaded. First we navigate to the download location and run the following command to verify the file against the key.
gpgv –keyring ./tor.keyring ~/Downloads/TorBrowser-10.0-osx64_en-US.dmg.asc ~/Downloads/TorBrowser-10.0-osx64_en-US.dmg
m
Successful verification of Tor software installer package.
So to recap, we first verified that the signature key was legitimate and then we used that signature key to verify that the file was legitimate.
Now that we are happy with the installer, double click the DMG file. You can now run the Tor browser as a regular browser from your system. After launching, go to https://check.torproject.org/ to ensure your browser is configured properly.
How to Install the Tor Browser on Linux
One important note before you start following this process. When it comes to launching Tor, never maximize it as using standard browser sizing increases the chances of you being tracked online. On Kali systems, you cannot execute Tor as the root user for security reasons, so make sure you add a new user with sudo privileges and switch to that user before doing any of the following (we created a user named “Josh”). First step involves install the Tor browser from the Tor Project and make sure you select the right version based on your operating system. However before we install the application, we are going to verify its authenticity to ensure it has not been modified as it moved across the internet.
Verifying the TOR Download
The developers of TOR provided a signature file on the download page (see the image below). This “sig” file is unique to this download and was generated by the developers when they generated the download package and can be used to verify that the package did not get modified.
Locating the “sig” file that you will use to verify the authenticity of your TOR package.Step 1: Head over to the Tor download page, as seen in the image below and click on both the “64-bit” and “sig” files.
Step 2: First of all you need to have GnuPG installed before you can verify signatures. If you are using GNU/Linux, then you probably already have GnuPG in your system, as most GNU/Linux distributions come with it preinstalled.
Step 3: Following the directions shown here, the next step is to fetch the Tor Developers key and then run the following command:
If things are working properly, you will not get a response from the system other than a command prompt.
Step 5: Verify the signature of the package with the “.asc” file that we downloaded before as well as the application file itself by running this command (note that sometimes the file versions numbers may be higher than shown before):
The response of the verification should look something like this:
Positive verification response to the Tor Developers signature file
The positive response means that the package has not been modified in anyway.
Step 6: Uncompress the file and switch to that uncompressed directory. Keep navigating down the directory tree until you get to the executable file as seen in the screenshot below.
Navigating down the directory tree on a Linux system in order to execute Tor Browser.
As this user, type in the following command to get the Tor Browser up and running:
./start-tor-browser.desktop
Once installed, it will look like the image below and you can use Tor like any internet browser.
What you should see when you open Tor for the first time.
Using Tor
When using Tor, you navigate the internet through a separate set of routers and will be able to visit sites without being easily tracked. This does come with a tradeoff in that using the Tor browser is slower due to a smaller number of routers, which limits the speed of the network. After launching, go to https://check.torproject.org/ to ensure your browser is configured properly.
Tor Bridges & Pluggable Transports
If you live in a regime that blocks Tor or need to access a web service that blocks Tor, you can also configure Tor Browser to use bridges. Unlike Tor’s entry and exit nodes, bridge IP addresses are not publicly listed, making it difficult for web services, or governments, to blacklist those IP addresses.
When using the Tor browser, you want to ensure that it is routing traffic through. In some situations, Tor is actively being blocked by your network admin or ISP. When you access Tor and send traffic across its networks, your data is seen by your Network Administrator or your ISP before the first Tor node, so your ISP could identify all the available Tor nodes and block access to them. The solution to this is to use a Tor bridge.
Tor bridges, also called Tor bridge relays, are entry points to the Tor network that are not all listed publicly. Using a bridge makes it harder, but not impossible, for your ISP to know that you are using Tor. If a bridge is not publicly available. This worked until ISP’s started using DEEP PACKET FILTERING to see what Tor traffic looks like. The solution to this is use pluggable transports to make you traffic look similar to non-Tor traffic, just regular internet traffic. Can still fail in some instances but the worst thing is that your ISP knows you were using Tor.
How to Use Tor with Bridges and Pluggable Transports
If you need a bridge and can access the Bridges page on the Tor Project:
If the ISP is only blocking Tor nodes and NOT using DPI (deep packet inspection), use a bridge. Get these bridges by clicking on the button that says “Just give me bridges!”
If DPI is being used by your ISP, you need get a pluggable transport from the same page, but use the Advanced Options section, which has a number of options that you may have to experiment within order to connect to the Tor network
Download Page for Tor Bridges and Pluggable Transports.
Make your selections from the page above and when completed, the next page you see is where you are presented with the bridges/transports.
Tor Project webpage presenting you with the bridges and transport code.
Once you have these codes, add them to your Tor Browser like this:
Adding Bridges in the preference portion of the Tor Browser
If you cannot access this page: https://bridges.torproject.org/options,
Send an email to bridges@torproject.org;
You will get a response with instruction as to how to get the bridges and pluggable transports via email;
Follow the instructions, which in this case were: Leave the email subject empty and write “get transport obfs4” in the email’s message body. Please note that you must send the email using an address from one of the following email providers: Riseup or Gmail.
See the screenshot below for the email I got in response. Follow the instructions from the screen shot above for inserting the bridge details into Tor.
Email response from Tor in regards to request for bridges.
How to Use VPNs with Tor
You can also use Tor with a VPN (You can learn more about VPNs in this article) by installing a VPN on your computer and then using the Tor browser. The data will leave the VPN in an unencrypted state and then get encrypted while in the Tor network.
This set up adds an extra layer of encryption so anyone who intercepts the data to your VPN will not know what the data is. This allows you to use Tor bridges and transports to maintain anonymity and bypass censorship. ALWAYS REMEMBER TO CHECK YOUR IP AFTER TURNING ON YOUR SECURITY INFRASTRUCTURE.
If your ISP blocks Tor usage, then using a VPN tunnel is a way to get around that as the ISP encrypts the data as it flows through your ISP, so your ISP cannot inspect it. If you were using just Pluggable Transports and Bridges (without a VPN) then people could tell that you were attempting to make use of Tor. A VPN also protects you from hackers as anyone connected to you network can easily view and modify the data. With a VPN, a hacker can still redirect your data, but they cannot modify/view the data as it will be encrypted. This is how you prevent “man in the middle” attacks.
Diagram explaining how a VPN keeps your data private as it leaves your computer.
How to Select a VPN
Remember that when you use a VPN, you are technically putting a someone in the middle of your internet traffic, so it is essential to select a reputable VPN. If you are really concerned about keeping private, you can take the extra step of finding a VPN that accepts crypto currency.
Find a VPN That Does Not Keep Logs
Because the VPN provider unencrypted your data in many cases, but is essential that you use a VPN that does not collect your data or maintain logs.
Avoid Free VPNs
“If you’re not paying for it; you (and your data) are the product.” as the saying goes.
Use HTTPS Everywhere
HTTPs Everywhere adds Transport Layer Security to your communication with the VPN (and the rest of the internet), so that you have two types of encryption when sending data from your computer to the VPN and even when the VPN decrypts your data to forward it, they cannot see what you are actually sending because it still has TLS encryption. This is installed in Tor by default, but not on other browsers.
TOR Security Configuration
NEVER USE TOR IN FULL SCREEN as the size of the screen can be used to footprint your computer based on its screen size. Always modify the size manually.
Configure the browser to automatically check for updates. See the screenshot below for how to configure the browser to do this.
Configuring the Tor Browser in order to have it automatically update itself.
Viewing the Tor Circuit. As seen in the screenshot below, you can see the jumps that data makes across the Tor network.
Viewing the nodes that data uses to cross the Tor network. Note the fact we are also making use of a bridge.
If you want to change the nodes, click the “New Circuits for this Site” button and the IP address will change.
Generating a new identity. If you want to reset your Tor Browser (including deleting all data), click on the broom icon in the corner and you will trigger the dialog box you see in the screenshot below:
Generate a new Tor identity by clicking on the broom icon.
The browser will close and then open again and you will be a new person. If you just regenerate the circuits, the other sites that you are currently visiting in other tabs will make use of your current identity.
Additional Settings: Configure Tor to never remember your history and prevent accessibly services.
How to Use Tor Security Settings
Click on the “Shield Icon” to modify advanced security settings.Tor’s Security Level settings.
As you can see, by default we are at “Standard” as the default. This makes Tor as usable as any other browser, albeit slower. Moving it to “Safer” disables some features and makes websites look different sometimes. The “Safest” mode disables Javascript completely, videos will not play, some html content will be blocked. Changing these settings changes the shield Icon. Read our article on how safe is your browser to understand how much data your browser gives away.